Table of Contents
So you've gotten a few drafts under your belt and you're starting to really understand why it's the best format (just kidding (no I'm not)) That's wonderful! If you are completely new to drafting, check out this guide instead. Don't worry, you'll be back here in no time! If you are a more advanced drafter, I'd still recommend skimming the beginner guide, because a lot of what I talk about here is built off of that.
This guide is designed for people already familiar with HOW to draft, but are looking for some tips to bring their game to the next level. None of these tips are necessary to "win a draft" in the same way the beginner tips may be, but nevertheless, every edge matters!
Know the Format
The first and most important tip in this article is to know the format. If you go in completely blind without knowing any of the cards in the set, you're going to be at a pretty severe disadvantage, especially if the set has been out for a while. Imagine you sit down to draft Jump to Lightspeed and you aren't aware of its overall vehicle theme. That will really impede your ability to make wise decisions when it comes to drafting leaders, and by the time you're thinking "huh, there are more vehicles than I was expecting" it's already halfway through pack 2.
I'm not saying you need to be intimately familiar with every card. Draft is a format where cards that don't usually see play can shine, so even seasoned drafters have to stop and read cards that are played infrequently. All I would suggest is read a 5-10 minute guide/primer on the set before you go out if you want to make a massive difference in your game-play.
This matters a lot less at the beginning of a new format, but even still - knowing which themes to look out for in the drafting process early on can make a huge difference, even if you don't know individual cards.
Table & Signals
Now let's talk about the structure of the draft itself. This is a pretty minor point but it definitely is worth mentioning. When you are finished the leader portion of the draft and crack into the cards of that first pack, you should keep in mind other cards that may come back to you. Setting yourself up for a nice "wheel" can be both a great way to start building synergies in your deck, and can help give you signals about what aspects may be available to you. This is very handy for the first few packs. You shouldn't necessarily make your picks based on "what might wheel", but it's something to keep an eye out for.
If you do get back that sweet Command card for example, then that's a really good sign that you should be in that aspect.
Draft is designed for 8 people, but sometimes due to player count, people will run it with pods of 6 or pods of 10. It's important to understand how that will affect what comes back around the table to you. It's never a guarantee, but I would put a lot more faith in a card coming back when there are only 6 folks at the table than when there are 10 folks at the table. Subtly work that into your game-plan and you will be building on average better decks.
Draft synergies and curve fillers
Good drafters know that their deck should be loaded with good 2 and 3 cost cards. GREAT drafters know when to break that rule. Sometimes, it is worth sacrificing a bit of turn 1 consistency if you see a card that has great synergy with the rest of your deck. It's a bit hard to write a guide on this element because it often feels very vibes based, but in essence you should be asking yourself two questions.
1. When I play this card, will it massively improve my chances of winning that game, and can I play it consistently.
Obviously a card like Annihilator, Tagge's Flagship will win you the game when you play it, but that doesn't make it a good card, since the "when you play it" will be basically never. I'm talking about mid-cost efficient synergy pieces like Clone Commander Cody, Commanding the 212th. This card is not a bomb on its own - in fact, it's a little underwhelming, but obviously great if you get there on tokens. This card certainly will win you the game if you build around it, and depending on the circumstance could absolutely be worth taking over a good 2 or 3 cost card.
2. Do I actually have enough early cost cards that I can afford to take this piece.
Let's use Cody as an example again. Imagine a scenario where the draft hasn't been particularly kind to you. You sort of have a tokens package but your curve is wonky. You're in the first couple picks of pack 3 and someone passes you Cody. You look down at your pool and notice you have four 2-3 cost units. Even though Cody would be a nice synergy piece, you really can't afford to take it over an efficient 2 or 3 cost card. Sometimes you have to reluctantly swallow your pride, take the boring 2 drop, and pray that Cody will wheel (he will not).
I would also recommend not getting TOO cute with the synergy pieces. While it's funny to imagine a draft deck with 11 copies of Swarming Vulture Droid, that's probably not usually a great game plan (but if you can make it happen, send me a picture that sounds awesome).
There are other times where you don't take 2-3 cost cards of course, but they tend to be a bit more trivial, like taking a bomb or some kind of efficient removal. Once again see my beginner guide.
Deckbuilding
Luckily, deckbuilding in Star Wars Unlimited draft is actually not that bad (usually). In Magic: The Gathering draft, deckbuilding is often almost as hard as drafting, as you have many cards to cut or add, then you have to deal with your land-base. If you are someone experienced with MTG drafting & deckbuilding, you'll find this very straightforward.
You will usually have approximately 30 cards after the draft portion, plus or minus a couple. It's rare that you'll have cards that are worth splashing UNLESS you are in need of removal. Oftentimes if you drafted efficient, off aspect removal, it is very much worth paying extra for it. For example, in JTL draft I will treat Direct Hit basically like an aspect-less 6 cost card that sometimes will cost 4. I will take it whenever, because that sort of effect is SO important. That's very much an exception and not a rule though.
In the event where you drafted under 30 on-aspect cards, the first place you should be looking is heroism-villainy. Imagine you're building a heroism deck. There's a good chance you drafted a few very strong villainy cards in the early parts of the draft, see if those fit your curve. Remember, if you draw something and the aspect penalty is going to be killer in that moment, you can always just resource it!
In the event where you drafted OVER 30 on-aspect cards, I often look at 2 things when deciding cuts.
1. Which cards will not really affect the board.
Sometimes you just get a few cards that really aren't that good, even if they are on aspect. With cards like Jump to Lightspeed, it's easy to imagine the nuts scenario where everything works perfectly, but it is more common that this card feels dead most of the time. It doesn't really affect the board, so if you're looking for cuts, cut it.
2. Which cards don't really help my curve.
If I already have like 6 good four cost cards and I'm looking for a cut, maybe one of those would be something I'd look at, even if they are otherwise good. If you have enough cards in one slot, you're going to have to often chose which one to play on curve, and while choices are good to have, in most situations there will be a clearly preferred option. Sure, you can then play it later, but it's no longer on curve at that point. Having redundancy is great, but if you're looking for a cut, I often look to cutting "good" redundant cards over "okay" roll/curve fillers.
Choosing your aspects and when to pivot
Okay, I've saved this one for last because I'm going to get somewhat math-heavy. Don't worry, it shouldn't be too hard to follow.
In most situations, you want to be in a different aspect combination to those sitting next to you. The exact math is VERY complicated and nuanced, and the analysis done in this section is a reductive version of that math to help get you thinking about things probabilistically. One more disclaimer: knowing which leaders people have drafted nearby is crucial, as that can change the math as well.
The following math is based on Jump to Lightspeed packs.
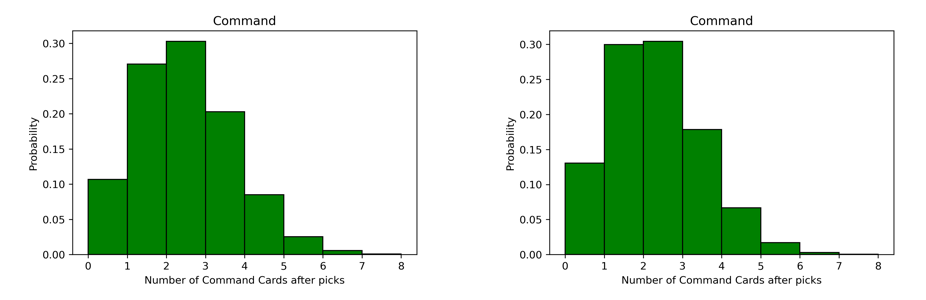
I made my computer open 1000000 "packs", and on average, there are about 3.15 Command, Cunning, Vigilance, and Aggression cards in each pack. They are distributed as per Figure 1.
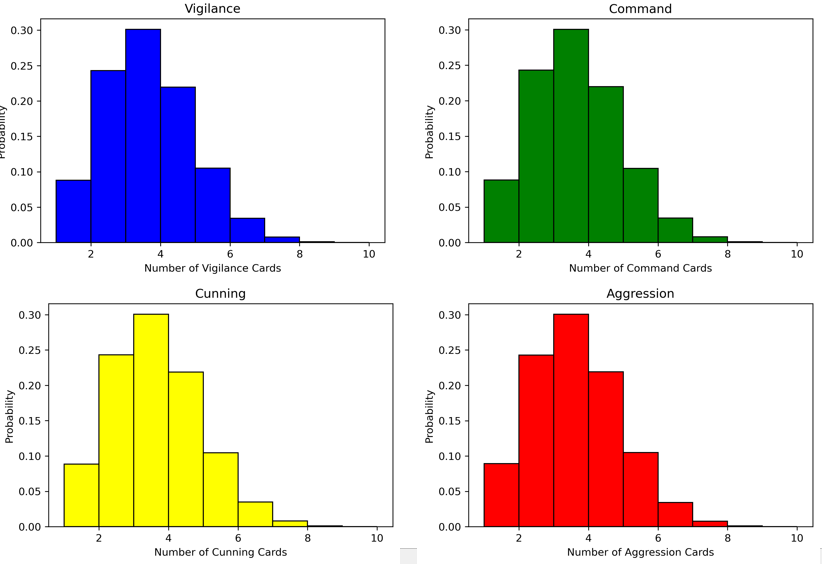
For this analysis, let's say you opened a very strong Command card and you're interested in staying in Command for now. In principle you can swap that for any aspect and the analysis would still work, given an approximately equal number of cards of each aspect in the given set.
Now let's say you're at pick 2. You've taken your Command card and the person next to you hands you their pack. What should you expect to see? Well, if they've taken a Command card, you'd expect to see something like Figure 2.
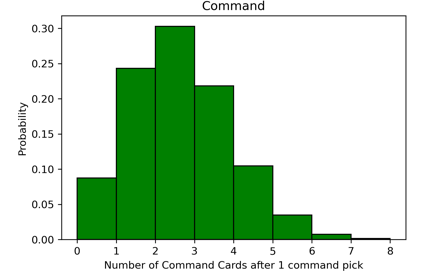
As expected, the average number of Command cards is now one lower. Let's continue this, assuming that the other two people next to THEM are also taking command cards. We'll call this the "worst case scenario". Check Figure 3 for those graphs.

As you can see pretty clearly in Figure 3, if the folks next to you are all in Command, it's pretty likely that you'll start to see 0 Command cards making it to you, and it may be worth considering a swap. This is very much the worst case scenario though, let's look at a more realistic situation.
In Figure 4, we explore the situation where the person beside you is in Command, but the people next to them are in an aspect determined at random. We've already seen what the first two picks of this scenario look like in Figure 1 and Figure 2, but picks 3 and 4 can be found in Figure 4.
In a situation like this it's very possible that you could stay in Command. Fighting the person next to you for the best cards in that aspect will be rough, but in some situations it can be worth it. It becomes a value judgment based on how good and open your other aspects are, and how well your draft pool seems to be enabling whatever pick 1 Command bomb that brought you to the aspect in the first place.
In the case where nobody is taking Command cards, you expect the distribution of Command cards in a pack to resemble Figure 1. This is the best case scenario. As you can see by looking at Figure 1 and Figure 4, if you still see 4 Command cards by pick 4, that's a very good sign that Command is yours for the taking.
Ok this is all great (citation needed), but when sitting down to draft, you don't actually have a probability space of 1000000 possible futures sitting in front of you. You have one discreet data point at a time. How can we use those plots most efficiently?
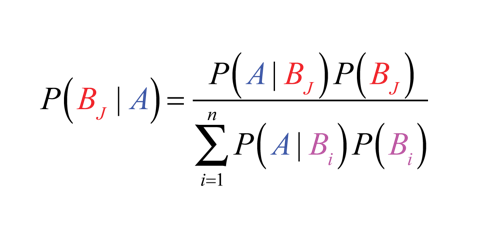
Time to break out the statistical analysis because it's Bayes' Theorem!
If you have never seen Bayes' theorem before I recommend watching a video about it just to get the basics, but if you don't want to do that I will try my best to explain it here.
Bayes' theorem tells us something about CONDITIONAL probabilities. That is, the probability that something happens given that something else happened. P(B|A) represents the probability that event B happens GIVEN THAT event A has happened. P(B) is the probability that B happens, and P(A|B) is the probability that A happens GIVEN THAT event B has happened. Here is a worked example, if you'd like to see it in action (it is a VERY cool theorem, and very powerful).
We can apply this to Star Wars Unlimited drafting in the following way. Let's say you're looking at your second pick and you see 2 Command cards. What's the probability that the person sitting next to you took a Command card? Well, let's define our variables. P(A|B) is the probability that there are 2 Command cards GIVEN THAT they took a Command card. We can look at Figure 2 to get that number, it's approximately 30%. The denominator of this equation includes a sum (that's what the Greek Sigma represents) that includes a new number, the probability that there are 2 Command cards GIVEN THAT they did NOT take a Command card. We can take this from Figure 1, approximately 24%.
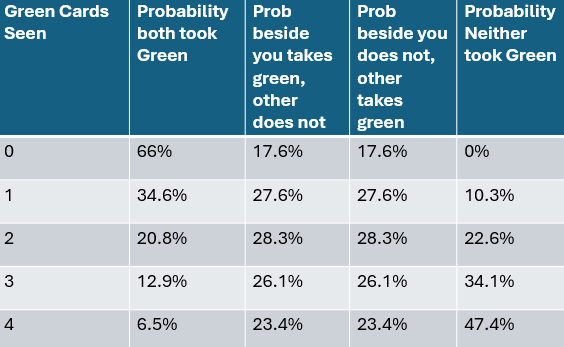
Plugging all of these numbers in, we find that the probability that the person sitting next to you is in Command given you see 2 Command cards in your pick 2 is approximately 55%. Other numbers of Command cards can be seen in Figure 6.

In pick 3, similar analysis can be done, giving Figure 7.
Now, as I mentioned, some of these numbers could be changed depending on people's leader choices. If the person to the next of you inexplicably drafts three Command leaders for some reason, it's more likely they will prioritize Command cards. Likewise, if nobody around you has drafted any Command Leaders, maybe it's less likely (although still not unlikely, remember bases) that they will be eager to draft early Command cards. While thinking about things statistically can be helpful, please remember to apply your own nuance and draft experience to the picture when making decisions.
Let's talk briefly about how to pivot. Let's say you start out in Command and then realize in a couple of picks that it's probably not the spot to be. While taking the Command cards, keep an eye about what cards are still in the packs. Maybe Command is drying up but there are some very good Aggression cards going by. It's important to take mental note of that, or you may be 5 picks deep, now knowing that Command is not the place to be, but not sure where you should be going. Try your best to have a clear sense of direction as often as possible.
Pivoting is a balancing game in draft though. You don't want to pivot too early or you risk misreading a signal that's just variance. Remember, even if the person to your left didn't take a Command card, there's still an ~8% chance that there will only be one in your pick 2 pack!
It's also important (maybe even more-so) to not pivot too late. Pivoting late can cause two things to happen. First, you will be missing out on good early pickups for whatever aspect you end up pivoting to. It's normal and even a good thing to miss a couple (staying open is great) when you're still trying to figure out what aspects you should be in, but you should try your best to minimize that.
Secondly, the person to YOUR left who you are passing cards to is getting signals from YOU. If you pass 4 very strong Aggression cards in a row, there's a good chance that they're going to start pivoting into Aggression. Depending on the card-pool, the person to THEIR left might also start taking aggression cards. In pack 2, that can really backfire on you.
Remember, hindsight is 20/20. At the end of the draft, it should usually be pretty obvious to you what was the most open. It's not always going to be the aspects you're in, but that's ok! It's important to have a healthy mix of understanding that variance happens sometimes, while adjusting your own draft habits to take greater advantage of your experience to ensure you get into those open lanes as quickly and cleanly as possible.
One more very minor point but can still get you marginal EV: people tend to play their showcases. If you're doing a draft and someone nearby to you is lucky enough to open a showcase, it's very likely that leader is getting forced. Congratulate them on their awesome pull of course, but you can definitely use that to your advantage.
Hate Drafting
Ok I lied, I actually saved Hate Drafting for last.
Hate drafting is the act of taking cards which you know you will not play, purely because you have an idea of what people you are passing to are drafting and you want to make their decks worse.
Hate drafting is kind of controversial and I absolutely understand why. At low stakes drafts, everyone is there to play their cards and have a good time. Deliberately making your opponents decks worse can kind of be a feelsbad moment for everyone. I personally try my best to avoid it in casual environments unless there's a very good reason to be doing it.
At higher stakes drafts though, of course it's fair game. When hate drafting, you have to make sure you aren't making your OWN deck worse. Let's say you have some signals from the person to your right that they are in Vigilance. Pack 2 begins and you open an insane bomb for Vigilance. You can pass it to them, or you can take it for yourself, so that if you are playing against that opponent, you don't need to worry about this card.
Hate drafting bombs is a very risky play though, since if there's a bomb in the pack you're looking at, there's a very good chance that you're early enough in the pack that there is a very solid playable for your deck present as well. Sure, you might be making their deck 10% worse by taking their bomb, but you might also be making YOUR deck 5% worse by not taking whatever solid playable was there.
In general, unless the bomb is genuinely unbeatable (looking at you, Gruff Triplets) I would generally avoid hate drafting early on. The real time to be hate drafting in my opinion is later in the pack. Let's imagine a similar scenario, you're sitting to the left of someone in pack 2 and you have a pretty good read that they're in Vigilance. You look down at pick 7 and there is nothing particularly good in the pack for you. MAYBE you'd play one of the cards but it's very replaceable and there is a whole pack left. Also in this pack is a Rival's Fall. In a scenario like this, taking the Rival's Fall is completely reasonable, as those sort of effects are at a premium in draft, and taking it will almost certainly make the deck of your opponent a lot worse, and you aren't really missing out on anything by taking it.
Again though, depending on the seriousness of your play group, hate drafting is often frowned upon. The above scenario is describing a high-stakes event, where it is part of the strategy.
Conclusions
This is maybe the most unhinged piece of advice I have, but I think it's good. Ultimately, do what makes you like drafting. It's kind of like cardio. It doesn't matter how motivated you are to do cardio, if you hate running you're going to stop after not too long. You need to find something you actually find enjoyable like kickboxing or swimming.
The same is true with drafting. If trying to take marginal advantages and thinking about statistics isn't fun for you, then don't do it! Do whatever makes draft fun for you, because then you're going to keep coming out to draft. I can guarantee you one thing, the drafter who sacrifices a tiny win percentage to have more fun and comes out consistently ready to have a blast is going to be a MUCH better player in the long run than the drafter that tries to do everything perfectly and burns out in 3 weeks.
There will be an accompanying video to this article going up on my Youtube channel shortly, please go check that out as well, as I go into even more depth, and leaving a comment is probably the fastest and easiest way to reach me. (You can also follow me on Bluesky).
Thank you very much for your time reading this and as always, May the Force be With You!